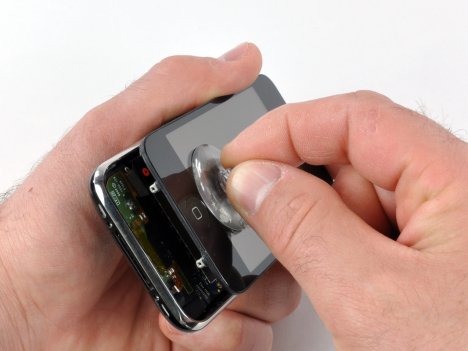
Conduct iPhone Screen Repair In Smart Way
iphone screen repair is definitely required if your screen has become damaged or has scratches on it. The tutorial will guide you how to do it.
Requirements:
- You will need a screw map.
- You will require your iphone.
- you will also require a screen for your iphone. There should be two cables attached to the screen at the top
- You will require a Phillips head screwdriver. It does not need to be very big. You can even opt to buy a repair kit.
- A Flat head screwdriver will also be needed.
- A paper clip will be needed to take the sim card out.
- You might need a pentalobe screw driver if you have the latest version of an iphone.
- You might require a pair of pliers.
- An X-Acto knife may be need for scrapping glass.
Guidelines:
The following points will guide you how to conduc iphone screen repair.
- The screw map plays a vital role in your screen repair. The map consists of a picture of an iphone and it will have circle present on the map that will indicate where to place the screw. Therefore you need to understand it first and then start working.
- you need to turn off your iphone completely.
- Use the paper clip and eject the sim card. Even if the sim card is not present you have to remove the tray because it locks into the mother board.
- There are two Phillips screws , they need to be removed. It is better to remove them with the help of a magnetic screwdriver. It makes picking the screw very easy.
- Once the screws are removed, the phone can be flipped to the back and the back panel has to be slided up and removed.
- The procedure has to be started by removing the battery, but first the head screws have to be removed that are present at the bottom of the battery connector
- Then once the screws have been removed a metal piece has to be taken out with the help of the pliers.
- Then the battery has to be pulled out gently without damaging the plastic sticker by its side.
- Now the emi shield has to be taken out by removing the screws.
- Now pull the plastic battery tab a bit and you will see screw underneath that has to be removed as well.
- Now the shield has to be taken out that is covering the ribbon cable.
- Now the vibrator screws have to be removed.
- Pull the plastic ribbon cable a bit and fold it to the side.
- Now the screws of the speaker module have to be removed so that the speaker module can be pulled out easily
- The screw at the top has to be removed also with the help of the flathead screwdriver.
- The next step is that the motherboard should be removed by the removal of the screws.
- Then the remaining screws have to be removed.
- Then the adhesive has to be removed from the glass panel.
- Then you can easily install your new screen.
- Then you have to put back all the screws and the iphone parts to reassemble the iphone.
If you follow the above mentioned steps it would become very easy to manage your iphone screen repair process.
httpv://www.youtube.com/watch?v=87XT53ON0VM


